SHARE


How to Set Up a Private Website or Web Page
March 25, 2026 | 10 min read
By WePage Team

Table of Content
A website is public by default, and most people do not think about that until the wrong person ends up with the link.
Maybe you are sharing internal materials with a small team. Maybe you are a teacher building a parent-only page for school updates. Maybe you are organizing a private event and you want one simple page for schedules, maps, and last-minute changes. In all those cases, you want the convenience of a website without the open-door feeling that comes with being searchable and shareable.
The problem is that "private" sounds technical. You start searching for answers and you run into terms like indexing, crawlers, meta tags, and server settings. It can feel like you need a developer just to hide one page.
You usually do not.
This guide explains what a private website is, when it's sensible to use one and also some easy methods of locking down a webpage that only designated individuals are meant to see. Then we will walk through the step-by-step process inside WePage, using the exact Restricted Access settings from the editor so you can set this up in a few clicks, test it, and share it confidently.
1. What Is a Private Website?
In simple terms, a private website is a normal web page that you intentionally limit so it is not open to everyone.
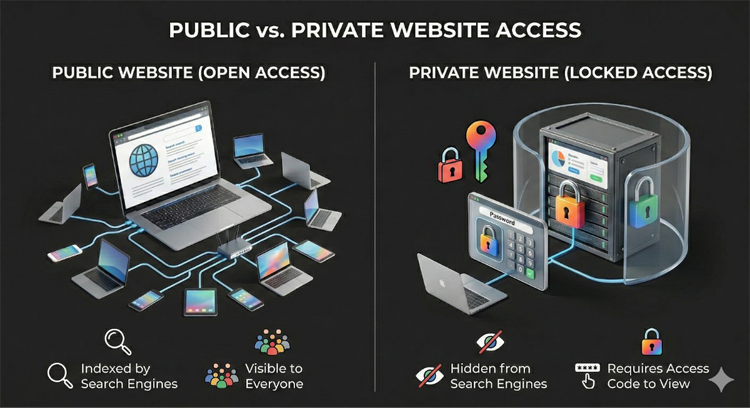
Most public websites function like digital billboards. You publish a page that search engines find out about over time, and it can appear in search results. In contrast, a private website operates similarly to a locked room. In order for visitors to get inside, you must give them your webpage's link and the access code, or if you restrict access in another controlled way.
There are two ideas people often blend together:
- Hidden from search engines so it does not show up in search results.
- Restricted by access control so visitors must enter a code or password to view it.
A page can be hidden from search results but still viewable by anyone who has the link. That is fine for some use cases. But if you truly need limited access, you want real access control, not just "do not index" instructions.
A practical way to think about it: if you are comfortable with "anyone with the link can view," hiding from search results might be enough. If you need "only invited people can view," use an access code.
2. How a Private Page Differs From a Public Website
 How a Private Page Differs From a Public Website
The easiest way to understand the difference is to look at who controls access.
Feature |
Public Website |
Private Website |
Search Engines |
Can appear in search results |
Usually hidden from search results |
Who Can View |
Anyone with an internet connection |
Only people with the link and access code |
Main Purpose |
Visibility, marketing, broad information sharing |
Limited sharing, internal updates, protected content |
3. Why People Create Private Websites
Not every website is meant to attract strangers. Sometimes you want a neat, organized place online that only specific people can open. That is the real value of a private web page. It replaces messy email threads, scattered attachments, and last-minute confusion over which version is current.
Here are common real-world reasons people create private websites.
3-1. Members-Only Information
Private pages are ideal for exclusive resources. For instance, if one is a coach, they may be able to share worksheets, video links, or even session notes to paying customers. If there is a small training program, then you could put the schedules and lesson materials on a private page rather than sending them emails every week. The benefit is control: you decide who has access to this information and can update the content at your discretion without having to resend everything.
3-2. School or Company Event Pages
Events change. Times shift. Locations update. People lose paper handouts. A private event page can hold schedules, map links, reminders, last-minute announcements, and photo uploads after the event. For a company offsite, a private page keeps employees aligned. For a school event, it helps parents stay informed without putting details out in public.
3-3. Personal Memory or Family Pages
A private page can be an extremely quiet place to share your photos and updates without posting everything on social media. Individuals utilize private pages for wedding photo albums, gathering planning, travel photos shared with close friends, and family updates that are not supposed to be part of the general public feeds. It is simple, controlled and very accessible via your phone.
3-4. Parent Pages for Schools and Daycares
Restricted access has a clear use case here. Teachers as well as school administrators can share some photos of events, important announcements, the latest activities as well as schedules. Parents can get updates at any moment without revealing their children’s information to the general public. Access control can minimize risks, yet it also demands a bit of common sense as to what to put up.

4. Ways to Make a Website Private
There are a few ways to set up private access. The best choice depends on how sensitive the content is and how comfortable you are with technical setup.
4-1. Option 1. Noindex Tag
A noindex tag is a line of code you add to a page to tell search engines not to include it in search results. This can be useful when you want a page online but not searchable. However, it has a major limitation: noindex does not lock the page. If someone has the link, they can still open it unless you add real access control. This method also assumes comfort editing page settings that may involve code. So noindex can help with "not searchable," but it is not the same as "private."
4-2. Option 2. Password Protection (Recommended for Beginners)
The easiest and most reliable option available for many beginners is password protection. The password protection feature requires that visitors enter an access code so that they may see the webpage. Even if an individual knows the URL but lacks the code, then they can't open up the page. This may be applied at a page level such as locking out a single page yet keeping the rest open or it could be done at a site level and lock out your whole website. WePage provides this capability through its restricted access feature inside Page Settings.
One important detail: restricted access applies to pages. Files linked from a restricted page are not automatically protected if someone shares the direct file link. Be thoughtful about what you upload and link.
4-3. Option 3. IP or Membership Restrictions (Advanced Users)
IP restrictions limit access to people on a specific network. Membership restrictions require each visitor to have their own login account. These options can be useful but usually require server configuration, added systems, and ongoing user management. For most beginners, it is too much setup for a simple private page.
5. How to Set Up a Private Page in WePage
If you want a clean, code-free setup, WePage makes this straightforward through page settings.
5-1. Step 1. Log into your WePage dashboard
Open your WePage editor and go to the site you want to work on. This is a good time to decide whether you want the whole site private or only a specific page private.
5-2. Step 2. Open Page Settings
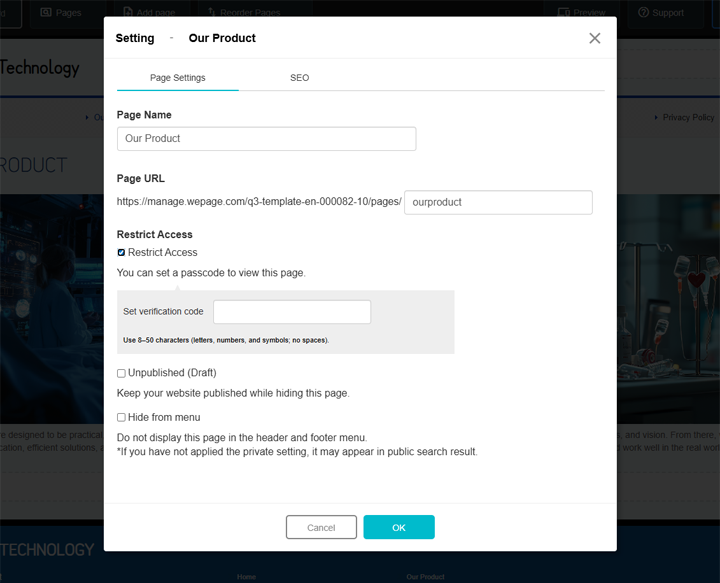
In the editing screen, click the second menu item from the left. This opens the settings for the page you are currently editing. Inside Page Settings, you will find options including Page Name, Page URL, and Restricted Access.
5-3. Step 3. Turn on Restricted Access
Find the Restricted Access setting. Check the box to enable it, then enter your access code in the "Set Access Code" field. Access code rules in WePage:
- 8 to 50 characters
- Single-byte alphanumeric characters and symbols
- No spaces
Pick something people can type correctly, but avoid anything obvious like birthdays or simple sequences. A pattern that works well: a short phrase + numbers + a symbol. For example: SpringMeetup24!
5-4. Step 4. Choose Site-Wide or Page-Level Restriction
This is a key point many beginners miss. If you set Restricted Access on the top page, the access code applies to all pages at once. If you set Restricted Access on a specific page, only that page is restricted.
- If this is a private family album or a parent-only site, site-wide restriction makes sense.
- If your business wants a public homepage but a private internal page, use page-level restriction.
5-5. Step 5. Save, Publish, and Test
Save your changes and publish. Then test it like a normal visitor would: open the page in an incognito or private browser window, confirm you get the access code prompt, enter the code and confirm the page loads, and click around to confirm restriction works the way you intended.
Also test linked files. Restricted access applies to pages, and files linked from a restricted page are not automatically under access control. Avoid linking sensitive documents in a way that could be accessed directly by URL.
6. Important Security Notes Before You Go Private
Setting up restricted access is easy. Managing it well is where people slip. A lock works best when you treat the key carefully.
6-1. Password Management
Avoid weak codes like birthdays, phone numbers, your brand name plus a number, or sequential patterns. Share the access code through direct channels like email or private chat. Do not post it in public spaces, including public social posts or open group forums. If the audience changes, change the code.
6-2. Be Careful with Personal Information
Even behind an access code, avoid treating the page like a vault. People can screenshot. People can forward the code. People can share the link. Avoid sharing some information which will bring harm on leakage like full home address, personal phone number, finance information, or sensitive information that can expose some routine or location. If you have children’s photos, think about what you share and the way you recognize individuals.
6-3. Understand the Risk of Undoing Privacy
If a private page is made public even briefly, it can be discovered, saved, copied, or archived quickly. That does not mean you should never post anything. A calm rule of thumb helps here: if it would be disastrous for a stranger to see it, it probably should not be posted online at all.
7. Choosing the Right Website Builder for Private Pages
Plenty of platforms offer privacy tools, but beginners often struggle because the settings are buried, the language is unclear, or the restriction options feel confusing. If your goal is a private page, look for these basics:
- An easy dashboard where settings are straightforward to find
- Built-in password or access code protection
- The option to restrict one page or the whole site
- A free plan so you can test the workflow before committing
If a platform makes you install extra tools or dig through complicated menus just to restrict a page, it creates more friction than it solves.
7-1. Why WePage Is a Simple Option for Private Websites
WePage is built for people who want to put information and photos online without needing to understand technical website setup. The restricted access workflow is practical: you can set it from Page Settings, apply it site-wide by setting it on the top page, or apply it to a single page if you only need to lock one section. You do not need to edit code to get a basic private page working.
Additionally, things are straightforward. The length and character requirements of the access code simplify it for newbies to set up the required functionalities and check them quickly. Whether you want a website for parents, internal events, sharing with family members or creating content for a small group of people, its ease of use is the key feature needed.
8. Conclusion
A private website can be a smart way to share information online without opening it to everyone. It works well for school updates, internal company pages, private events, and family sharing. While there are technical ways to hide pages, most beginners get the best results from built-in restricted access tools that add a real access gate.
To get an easy route, create a free WePage account, build your page, go to Page Settings, turn on Restricted Access, and then see how it performs using a private browser window before anyone else views it. Once it works out well, give out the link and access code to those who are supposed to have them and you will have a nice, private space online minus all the technical problems.
SHARE
Related articles