SHARE


)

How to Add a Calendar to Your Website (3 Easy Methods for Beginners)
March 25, 2026 | 13 min read
By WePage Team
Table of Content
When someone visits your website, they usually want fast answers. Are you open today? When is the next workshop? Do you have availability this Tuesday? If they have to dig through paragraphs of text or send an email just to find out your schedule, there is a good chance they will just leave. Adding a functional calendar to your site solves this problem instantly.
However, for a beginner, the idea of adding a working calendar sounds highly technical and complicated. You might be imagining lines of code, expensive software, or confusing integrations.
It does not have to be that way. This guide explains exactly why a visual calendar matters for your business and breaks down the three main ways to add one. We will walk you through a step-by-step guide for the most popular free method, and then show you the absolute simplest route for beginners to get a calendar live in minutes.
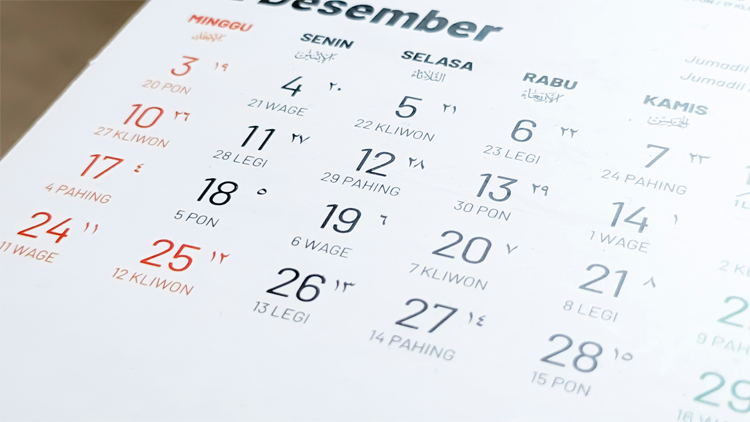
1. Why Add a Calendar to Your Website?
A website should be a helpful tool, not just a static digital brochure. Showing your schedule visually saves you time and provides a much better experience for your customers. Here is how real businesses use them:
1-1. Business Hours and US Holidays
Writing out your hours in a text block gets messy the moment a holiday rolls around. A clear visual grid is much easier for a customer to read. If you run a local diner or retail shop, a calendar lets you clearly block out Thanksgiving closures, modified July 4th hours, or Labor Day weekend adjustments so nobody drives to your store only to find the doors locked.
1-2. Real-Time Booking or Availability
If you are a photographer, therapist, teacher or consultant, then there may be a high likelihood of receiving loads of confusing email scheduling. "Would 2 pm be okay?" "That does not work; can it be done on Thursday?" The display of a calendar with all available time slots would reduce the continuous back-and-forth communication. Customers can check the available slots and determine their most preferred time, saving you hours of administrative work.
1-3. Events and Classes
Whether you are running into fitness classes, church events, school fundraising, or corporate seminars, an event calendar is pretty necessary. The monthly visual display helps the visitors have a look at all the activities scheduled in one go which naturally gives out a high turnout. One can also use color-coding in events by category (for instance, using blue for the children's class while using green for adult seminars), improving clarity.

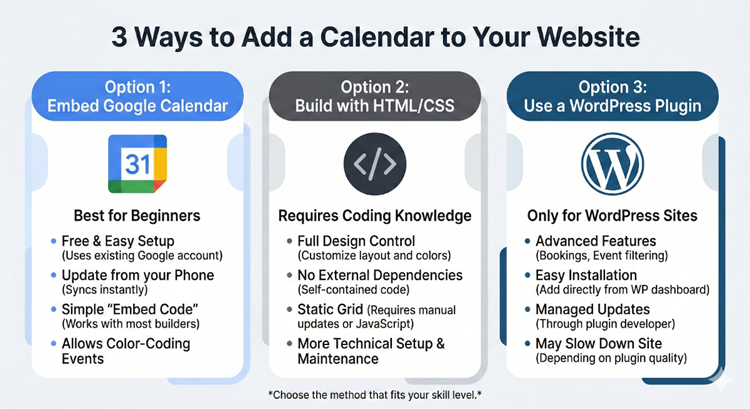
2. The 3 Ways to Add a Calendar to a Website
There is no single "right" way to add a calendar, but there is definitely a best way for your specific skill level. Here is a brief explanation of the three main methods.
2-1. Option 1. Embed Google Calendar (Best for Most Beginners)
For most small business owners, Google Calendar is the most sensible manual choice. As long as you have a Google account, it is completely free. The greatest advantage is convenience: if you update your schedule from the Google Calendar application on your phone, your website will update instantly. It has color-coding and can be made to work with nearly all website builders just by copying and pasting an embed code.
2-2. Option 2. Build One with HTML/CSS
You can build up the calendar grid from scratch using HTML/CSS (and use JavaScript to make it interactive). In doing so you get 100% full control over all your designs at the pixel level. Nonetheless, if there's no JavaScript, then the calendar is just static; that is to say, you'll be required to update it manually whenever a new month comes up. However this method would be an overcomplication requiring very high technical know-how and constant maintenance unless one is a skilled web developer.
2-3. Option 3. Use a WordPress Calendar Plugin
If your website is built on WordPress, then you would definitely need to make use of a plugin (which is a third-party add-on). There exist numerous choices for options like simple display calendars, complex event focus and booking plugins, etc., thousands of which ones. However it is a major setback because you have to rely on the efforts of third party developers. As plugins need constant upgrading of software, they can sometimes conflict with your theme, and also heavy plugins can affect the speed of your website.
3. Step-by-Step: How to Embed Google Calendar
If you want to use the free Google Calendar method, here are the literal, step-by-step instructions to get it on your site in about ten minutes.
3-1. Step 1. Create a Separate Calendar for Your Website
Do not embed your personal calendar. You do not want your website visitors seeing your private doctor's appointments or family dinners. Open Google Calendar, click the "+" next to "Other calendars," and select "Create new calendar." Name it something clear, like Business Hours, Events, or Availability.
3-2. Step 2. Set Visibility Correctly
Hover over your new calendar in the left sidebar, click the three vertical dots, and select "Settings and sharing." Scroll down to "Access permissions" and check the box that says "Make available to public." You must do this, or your website visitors will just see a blank error box. You can choose the appropriate detail level here (e.g., showing all event details vs. just showing "busy"). Safety note: Even on a business calendar, never put sensitive personal information in event titles.
3-3. Step 3. Copy the Embed Code
On that same settings page, scroll further down until you find the section labeled "Integrate calendar." Look for the box labeled "Embed code." It will look like a messy string of HTML starting with <iframe.... Copy that entire code.
3-4. Step 4. Paste Into Your Website
Log into your website builder. Navigate to the page where you want the calendar to live. Look for a block or element called "Embed," "HTML," or "Custom Code" and drag it onto your page. Paste the code you copied from Google directly into that block. Save your draft and preview the page—your calendar should now be visible!
3-5. Step 5. Test on Mobile
Before you celebrate, check the mobile view. Sometimes embed codes do not scale perfectly on small screens. Check the width and height, confirm that a user can scroll through the weeks smoothly, and verify that the page still loads fast.
4. Customize Google Calendar for a Cleaner Look
The embedded Google Calendar looks a bit rough by default. However, Google offers you a customization screen which you may use to clean it up prior to copying your embed code. In the "Integrate calendar" section, click on the Customize button.
Here is what you should realistically adjust:
- Resize Width and Height: The default size is 800x600. You may need to adjust this so it fits cleanly into your specific website layout.
- Choose Your View: You can set the default view to Month, Week, or Agenda (which displays as a clean, simple list of upcoming dates).
- Hide Clutter: If the calendar looks too busy, use the checkboxes to hide the title, the print icon, or the navigation buttons.
- Adjust Colors: Change the background color to match your brand, and ensure your business days and special events are color-coded logically.
- Remove Borders: Turn off the solid border for a much cleaner, modern look.
Once you have made these tweaks, copy the new embed code at the top of the screen and replace the old one on your website. The changes will reflect instantly.

5. Quick Checklist Before You Publish
Before you hit publish and send your new calendar out into the world, run through this practical beginner safeguard checklist:
- Correct US Time Zone Selected: Double-check your settings. If your calendar defaults to Pacific Time but your business is in New York, your visitors will show up three hours early.
- No Sensitive Notes Visible: Ensure you did not accidentally leave a private note or personal phone number in a public event description.
- Mobile Layout Tested: Open your live website on your actual smartphone. Does the calendar fit on the screen, or is it cut off?
- Links Work: If an event has a link for directions, an RSVP form, or a booking page, click it to make sure it isn't broken.
- Updating Responsibility: Decide exactly who is responsible for updating the calendar (you, your manager, your assistant) and how often it needs to be checked. An outdated calendar is worse than no calendar at all.
6. The Easiest Route: Use WePage’s Built-In Calendar Element
6-1. Why Embedded Calendars Can Feel Clunky
When you use an embed code, you are juggling two different systems. You have to manage your schedule in Google, but manage the design on your website. Copying and pasting HTML code can be intimidating, and if you accidentally delete a single bracket in the code, the whole calendar breaks. Plus, forcing an external iframe to look good on both desktop and mobile screens often requires frustrating formatting trial and error.
6-2. How WePage’s Built-In Calendar Works
If you want to skip the codes entirely, WePage offers a much simpler path. WePage has a calendar element built directly into its platform.
Instead of copying HTML, you simply open your WePage editor, grab the calendar tool, and drag-and-drop it exactly where you want it on the page. You edit your events and hours directly inside the website builder.
- No copying HTML codes.
- No third-party plugin conflicts.
- Quick, instant updates all in one place.
Best For:
- Store hours and holiday closures
- Event and class schedules
- Simple availability displays
WePage is available worldwide, with standard billing in USD, and offers a free plan. This means you can build your site, drop in the calendar element, and test how easy it is to use without committing your credit card.
7. Real-World Use Cases
Seeing a calendar in action helps you realize how much time it can save. Here are three quick scenarios:
7-1. Local Restaurant or Salon
A local hair salon uses their calendar to map out standard business hours. When the owner decides to close early for a family event, or when a major holiday approaches, they update the calendar. Customers check the site, see the temporary closure instantly, and the salon avoids frustrating voicemails from confused clients.
7-2. Event Organizer or Church
The community church employs a monthly events calendar that displays all the regular weekly youth programs and Sunday services along with additional monthly fundraising activities. Through this schedule visitors are able to view the month’s plan and identify any particular event they might be interested in within seconds as the categories are clearly color-coded such as blue for youth, gold for community outreach etc.
7-3. Service Provider (Tutor, Photographer, Consultant)
A freelance photographer indicates his availability on weekends during the busy fall portrait season. Rather than having clients email asking if he's available on the 14th, they look over the calendar viewing which dates are taken versus which are open, and they make an instant request for one of the open dates which reduces coordination time by half.
8. Conclusion
Adding a visual calendar to your website is one of the easiest ways to upgrade your visitor's experience. It answers their most pressing questions instantly and saves you from playing endless scheduling games in your email inbox.
While there are multiple ways to get the job done, you do not need to learn how to code or manage heavy plugins. For most beginners, embedding a free Google Calendar works perfectly. If you want an even easier, code-free experience, using WePage’s built-in calendar element is the absolute simplest route.
The best way to learn is by doing. Start by creating a free draft page on your website, add your calendar, preview it on your mobile phone, and publish it with confidence. A clear schedule builds trust and saves time.
SHARE
Related articles